Ghibli Style Image Converter: Animate Your Photos Easily
Learn how to use our ghibli style image converter to transform your Ghibli-inspired photos into an animated video with clear, step-by-step instructions. Perfect for aspiring animators and creatives.
Ghibli Style Image Converter: Animate Your Photos Easily
Introduction
Have you ever dreamed of transforming your favorite Ghibli-inspired photos into a captivating animated video? Our ghibli style image converter offers an exciting way to bring your images to life with the magic of animation. Many creative enthusiasts and students face challenges when trying to replicate the enchanting art style of Studio Ghibli in digital form. Questions like “How can I convert still images into a smooth animated sequence?” and “Which software should I use to achieve a true Ghibli look?” are common. In this tutorial, we provide a clear, step-by-step guide to help you overcome these obstacles. You’ll learn how to collect your images, plan your storyboard, select the right tools, and apply dynamic effects—all in simple, easy-to-follow language.
Step 1: Collect and Prepare Your Ghibli-Inspired Images
Before you begin your animation project, gather high-quality images that capture the essence of the Studio Ghibli style. Here’s how to get started:
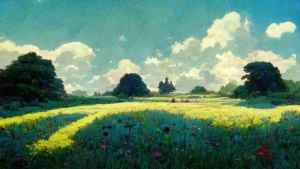
- Image Selection: Choose images that feature soft color palettes, whimsical landscapes, and expressive characters.
- Resolution Matters: Ensure your images are high-resolution (at least 1920×1080) to maintain clarity in your final animation.
- Editing Basics: Use basic photo editing software (such as Adobe Photoshop or free alternatives like GIMP) to adjust brightness, contrast, and saturation for a consistent look.
Tip: Organize your images into folders based on themes or scenes. This simple step helps streamline your workflow later on.
For more insights on image preparation, check out Adobe’s Creative Cloud tutorials.
Step 2: Craft Your Viral Moment with a Storyboard
A storyboard is the blueprint of your animation. It helps you visualize the sequence of your images and plan the transitions.
- Sketch Your Ideas: Draw rough sketches or write down notes for each scene.
- Sequence Planning: Arrange your images in the order you want them to appear. Think about how each scene flows into the next.
- Timing and Transitions: Decide on the duration for each image and how you want to transition between them (e.g., fades, slides, or zooms).
Using a storyboard not only organizes your creative thoughts but also ensures you capture that viral moment that resonates with viewers. Consider using free online storyboard tools like Storyboard That to plan your project.
Step 3: Pick the Ideal Animation Software
Selecting the right animation software is crucial for transforming your images into a smooth video. Look for software that supports the features you need and matches your skill level.
- User-Friendly Interface: Choose software that is intuitive and easy to navigate.
- Keyframe Animation: Ensure it supports frame-by-frame editing and smooth transitions.
- Export Options: Check if the software can export videos in high resolution for sharing on various platforms.
Some popular options include Adobe After Effects, Blender (free and open-source), and Toon Boom Harmony. For a detailed comparison, visit TechRadar’s guide on animation software.
Step 4: Import and Arrange Your Visual Assets
Once your images are prepared and your storyboard is set, import your visual assets into your chosen software.
- Organize Layers: Create separate layers for each image and any additional elements like text or effects.
- Timeline Setup: Arrange your images on the timeline in the order of your storyboard. Adjust the duration for each frame to suit your narrative.
- Backup Your Work: Save your project regularly to avoid losing progress.
This stage is all about creating a strong foundation for your animated video. A well-organized timeline ensures that your animation flows smoothly from one scene to the next.
Step 5: Apply Frame-by-Frame Motion and Smooth Transitions
Now comes the creative part—bringing your images to life with movement and transitions.
- Frame-by-Frame Animation: Use keyframes to animate subtle movements such as a slight zoom or pan across an image.
- Smooth Transitions: Experiment with transitions like crossfades or dissolves to enhance the flow between scenes.
- Consistency is Key: Ensure that the speed and style of motion remain consistent throughout the video to maintain a cohesive look.
Using frame-by-frame techniques, you can add a dynamic and professional touch to your animation. This technique is essential to achieving a fluid, movie-like experience reminiscent of Studio Ghibli films.
Step 6: Enhance with Atmospheric Effects and Dynamic Lighting
Atmospheric effects and dynamic lighting can dramatically elevate the visual appeal of your animated video.
- Lighting Effects: Adjust brightness, contrast, and shadow to create depth and focus in each scene.
- Atmospheric Filters: Use filters that mimic fog, rain, or magical glows to add an extra layer of visual interest.
- Color Grading: Apply color grading to achieve the signature soft, vibrant hues of Ghibli art.
For more detailed tutorials on lighting and effects, explore Digital Trends’ guide on lighting in video.
Step 7: Synchronize with Audio and Expert Sound Design
An animated video is not complete without the perfect soundtrack. Audio can enhance the emotional impact of your visuals.
- Select Background Music: Choose music that complements the mood of your animation. Instrumental tracks often work best.
- Add Sound Effects: Incorporate sound effects that match the actions in your animation, such as footsteps or ambient nature sounds.
- Voice Narration: If your animation tells a story, consider adding voice narration to guide the viewer through the scenes.
Ensure that the audio levels are balanced so that music and sound effects enhance rather than overpower your visuals. For free high-quality music, check out Free Music Archive.
Step 8: Render and Export Your Finished Animated Video
After fine-tuning the visuals and audio, it’s time to render and export your animation.
- Export Settings: Choose the highest quality settings available, typically 1080p or 4K resolution, depending on your needs.
- File Format: Save your video in a widely supported format like MP4 for easy sharing across platforms.
- Test Your Video: Watch the final output to ensure there are no glitches or errors in the animation or audio.
Rendering can take some time depending on the complexity of your project and the power of your computer. Patience is key during this stage to achieve the best results.
Step 9: Review and Refine Your Animation
Before finalizing your project, take the time to review and refine your animation.
- Seek Feedback: Show your video to friends or peers for constructive criticism.
- Identify Areas for Improvement: Look for parts where transitions may be too abrupt or where the timing could be adjusted.
- Make Necessary Edits: Return to your editing software to make any final tweaks.
This step ensures that your final video is polished and ready to impress your audience. Continuous refinement is part of the creative process and can significantly enhance the overall quality of your work.
Step 10: Share and Promote Your Animated Video
Once you are satisfied with your animated video, share it with the world.
- Upload to Video Platforms: Publish your video on YouTube, Vimeo, or social media platforms.
- Engage with Your Audience: Encourage viewers to leave comments and share their thoughts.
- Optimize for SEO: Use descriptive titles, tags, and meta descriptions (like the ones in this guide) to increase your video’s visibility.
Promoting your video not only showcases your creativity but also helps build a community of like-minded enthusiasts. You can also share your work on forums and social media groups dedicated to animation and Studio Ghibli art.
Additional Tips for Using the Ghibli Style Image Converter
Beyond the step-by-step process, here are some extra tips to make your experience with the ghibli style image converter even better:
- Experiment Freely: Don’t be afraid to try different effects and transitions. Creativity is about exploring new ideas.
- Stay Inspired: Watch Studio Ghibli films and study their art style to understand the subtleties that make the visuals so captivating.
- Learn Continuously: Follow online tutorials and join communities where you can exchange tips and tricks with other animators.
- Document Your Process: Keep a journal or blog of your projects. This not only helps track your progress but also serves as inspiration for future projects.
For more creative tips and resources, visit Aixplore Tech and join a community of innovative creators.
Expert Opinions and Industry Insights
Experts in animation and digital art recognize the growing popularity of tools like the ghibli style image converter. According to Animation Magazine, combining traditional art techniques with modern technology can lead to groundbreaking work in digital animation. Another reputable source, Wired, emphasizes the role of AI and digital converters in democratizing art creation, allowing beginners to produce high-quality animated content with ease.
These expert insights underscore the potential of the Ghibli style image converter to revolutionize how artists create animated videos while maintaining the nostalgic charm of Studio Ghibli art.
FAQs
Q1: What is a ghibli style image converter?
A1: A ghibli style image converter is a tool or software that transforms your still images into an animated video using techniques inspired by the art style of Studio Ghibli. It helps create smooth transitions and dynamic animations from static photos.
Q2: Do I need advanced technical skills to use a ghibli style image converter?
A2: Not at all. This tutorial is designed to be simple and accessible for beginners and students alike. Most tools come with user-friendly interfaces and step-by-step guides.
Q3: What software is recommended for creating Ghibli-inspired animations?
A3: Popular options include Adobe After Effects, Blender, and Toon Boom Harmony. These programs support frame-by-frame animation and smooth transitions, ideal for replicating the Ghibli aesthetic.
Q4: How long does it take to create an animated video using this method?
A4: The time required varies based on the complexity of your project and your familiarity with the software. On average, a basic project might take a few hours, while more detailed animations could require several days of work.
Q5: Can I add my own audio or sound effects to the animated video?
A5: Yes, integrating audio is a crucial part of the process. You can add background music, sound effects, and even voice narration to enhance the overall impact of your animation.
Call to Action
Ready to bring your Ghibli-inspired visions to life? Use our ghibli style image converter tutorial to transform your photos into an animated masterpiece. Start today, explore the creative possibilities, and share your animated videos with friends and the online community. For more expert advice, detailed tutorials, and the latest creative tools, visit Aixplore Tech. Step into the magical world of animation and let your creativity soar!